Software System
Data Structures, Calibration, and Logical Flow
Check out our Github.
Software System Overview
We use an arduino for motion control, which takes care of using our inputs to determine what to do with the wings.
For our overall code structure, we have a struct that stores the pin values for specific sensors and parameters that are associated with each wing, and a loop that calls one of our many motion functions, each determining a different behavior, that sense potentiometer, ultrasonic sensor, and flex sensor input, and use that to determine the motor control for each wing.
We use the Adafruit Motorshield library for DC motor control.
Data Structures
Because of the large number of sensor inputs and parameters for each wing, we made two data structures, a Wing and a Pair. A Wing contains all the pin locations for one wing, any parameters used for calibration and mapping, and the Adafruit DC motor object (provided by the Adafruit Motorshield library).
typedef struct { int sTrigPin; // ultrasonic echo pins
int sEchoPin;
int fTrigPin;
int fEchoPin;
int flexInputPin; // flex sensor pin
int potPin; // potentiometer pin
bool isWaiting; // is waiting for other one to meet it
bool isOpening; // is opening (in flap mode)
int upDirection; // motor direction for up
int downDirection; // motor direction for down
int minHeight; // minimum potentiometer value
int maxHeight; // maximum potentiometer value
int goalVal; // for going to a specific angle
int flexMin; // minimum flex sensor value (should be reached at top)
int flexMax; // maximum flex sensor value (should be reached at bottom
Adafruit_DCMotor *motor; // the motor
} Wing;
A Pair contains two wings, a left and a right.
typedef struct { Wing wingLeft;
Wing wingRight;
} Pair;
Calibration
We had 3 types of sensors, the ultrasonic sensors, the potentiometers, and the flex sensors. Each had to be calibrated, and because there are two wings, we had to separately calibrate the flex and potentiometer values. Since the level of precision required from the ultrasonic sensors was lower as we only wanted to know if something was really close, we didn’t bother to individually check our calibrations for any discrepancies between each of the 4 sensors.
For the potentiometers, the left wing was at minimum opening at a reading of 31 and at our maximum desired angle at 50, and for the right wing it was at a minimum at 41 and a maximum at 60. We determined these values experimentally by running the motors until the wings were at the points we wanted and reading the potentiometers, then verifying it over several trials.The potentiometers are linear, so we can linearly map any value in between min and max to an angle between them.
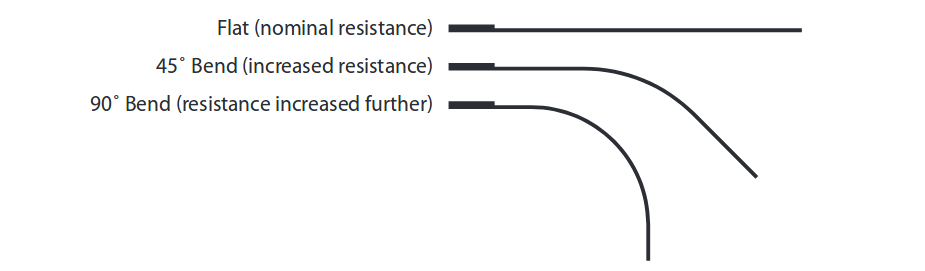
For the flex sensor values, we determined them by wearing the straps and measuring at a variety of angles. This sensor is also linear with angle, so once we determined the minimum and maximum flex sensor values that we expected, we could map very easily to potentiometer values. However, it is slightly complicated by the fact that we get the highest flex sensor reading at the minimum wing angle, and vice-versa. We fix this by flipping the signs when we use the map command. Then, to ensure that we always map to a safe wing angle, we constrain the range to be between the minimum and maximum potentiometer values.
int potGoal = constrain(map(-flexVal, -wing.flexMax, -wing.flexMin, wing.minHeight, wing.maxHeight), wing.minHeight, wing.maxHeight);
Code Logic Structure
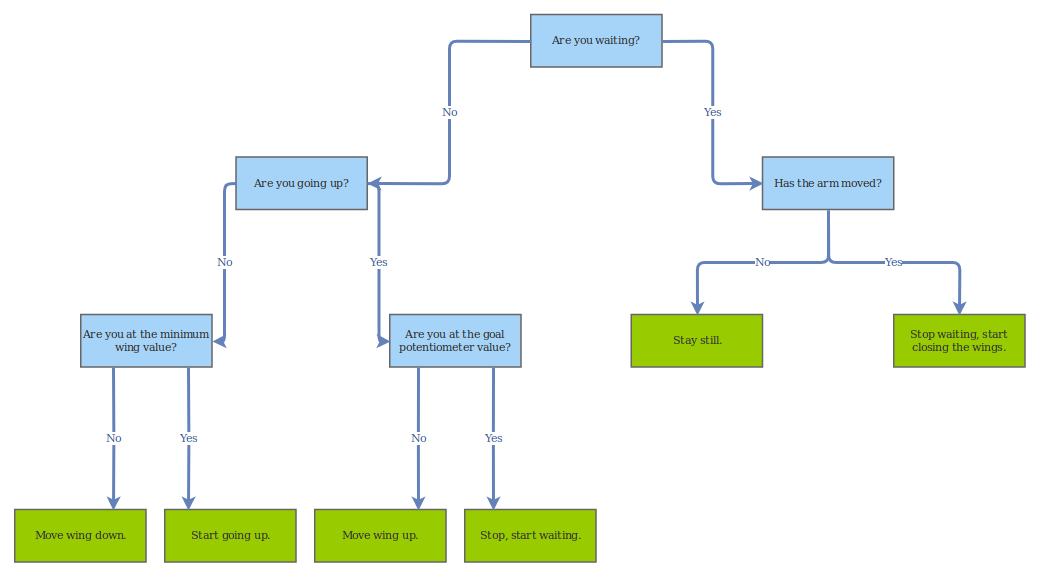
We have three programs that move both wings, one in which they flap up and down without user input, one in which they follow the arms, and one in which they flap down and then go up to meet the wings. Below is an explanation of the flap/flex program.
Each time the arm moves, the wing flaps down, then goes back up to meet the arm angle.
First, we read data from the potentiometers, the ultrasonic sensors, and the flex sensors. Then, we map the flex sensors to potentiometer angles.
We do some basic checking that we are not at too high or too low of a potentiometer value, which would indicate a problem that we should correct by moving up or down. We also check that the ultrasonic sensors do not indicate an obstacle, which we would correct by folding the wings in.
Then, if we are not in danger of hitting something, we go into the rest of the logic.
We use two boolean variables isOpening and isWaiting, to determine which direction we are moving. If we are waiting, and our goal potentiometer value is different than the actual one, that means we were waiting for the wing angle to change, and now it has, so we should start flapping down. We set isOpening to false (that means we’re closing), and isWaiting to false, then run the motor in downDirection.
// if youre waiting and your val is different, start to downflap.
if (wing.isWaiting) {
if (abs(potGoal - potVal) > 2) {
wing.isWaiting = false;
wing.isOpening = false;
}
}
Otherwise, if you aren’t waiting, check to see if you’re opening or closing. If you are closing, you should keep closing until you reach the bottom. If you’re opening, you should keep opening until you reach the potGoal.
else {
// if ur opening
if (wing.isOpening) {
// if youre not @ desired value yet
if (abs(potGoal - potVal) > 2) {
...
wing.motor->run(wing.upDirection);
// youre @ desired value!!!!!!
} else {
wing.isWaiting = true;
wing.isOpening = false;
wing.motor->run(RELEASE);
}
// if ur closing
} else {
...
wing.motor->run(wing.downDirection);
}
}