Communication
How data gets from here to there.
Challenge
Once a user has drawn their pancake, it must be sent to the Arduino for printing. While this might sound like a simple process, there are a few complications.
The first of these hurdles is the size of the Arduino serial buffer. When our microprocessor receives serial messages from the computer, it holds them in the serial buffer until we decide to read them. Unfortunately, we can only hold 64 characters in that space at a time. If we try to send more than 64 bytes at once, we will lose data. Because we cannot hold an entire pancake design in 64 bytes, we must periodically read data from the serial buffer into a larger memory location.
This brings us to SRAM, or static random access memory. This is the location where data within Arduino programs live. When we read data from the serial buffer it flows into SRAM. This memory pool has a lot more space than the serial buffer, 2 KB of space to be exact. Although it’s bigger, SRAM must be shared between all the data within a program, so far less that 2 KB is actually available. Still, even if we had all of this space at our disposal, it would not be enough to store an entire pancake design, which averages at about 3 KB in size.
With these memory constraints, there’s no way we can hold all of the serial data on the Arduino at one time. This is why we have chosen to send bits of the data as they are needed. The exact way this works is described in the protocol section below.
Protocol
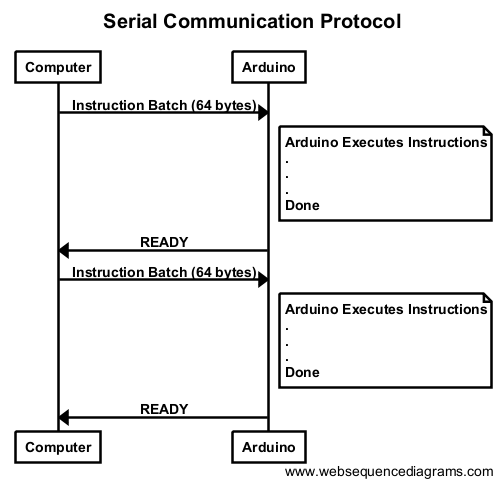
Due to the realities of limited memory, we came up with a real time protocol for data transfer between a computer and the Arduino. As stated earlier, only 64 bytes can be stored in the Arduino’s serial buffer at any time. This is why we send printing instructions in batches no larger than 64 bytes. When the arduino receives a group of instructions, it immediately executes each one of them. Then it sends a “READY” message back to the computer, signaling that the Arduino is prepared to accept another batch of commands. This cycle continues until the entire list of instructions necessary to produce the designed pancake have been sent and executed. We can see this behavior in the timing diagram above.
Instruction Format
Instructions are sent in a specific format from the computer to the arduino in order to manipulate the different electronic components. The format we’ve chosen begins with a single character that indicates the instruction type and is followed by any necessary parameters. For example if we want to move the gantry to the coordinate (24mm, 65mm), we would send the command “M 24 65” followed by a newline. The “M” in this example indicates a move operation. The entire list of commands is documented in the table below.
| Operation | Identifier | Parameters | Example |
|---|---|---|---|
| Move Gantry | M | the x and y coordinates | M 24 65 |
| Extrude Batter | E | whether or not to extrude batter (1 or 0) | E 1 |
| Set Grill Temperature | T | the target temperature | T 350 |
| Wait | W | how long to delay in ms | W 250 |
| Done | D | none, signals the program is done | D |
Timing
Timing was a concern brought up by the choice of our real-time protocol. Since our Arduino is capable of having only one thread of execution, simultaneous operations are not possible. This was a potential issue because printing must cease while the Arduino reads incoming instructions. An analysis of the communication speed helped us make sense of this concern.
The time it takes to send a batch of instructions can be calculated. We already know that we are sending 64 bytes at a time, but at what rate is data transmitted? When we initialize communication between the arduino and the computer, a baud rate of 115200 is agreed upon. This means 115200 bits can be sent each second. With this information we can calculate that sending a 512 bit (64 bytes with 8 bits per byte) message at a speed of 115200 bits/second will take 0.004 seconds. This is relatively quick and has not shown any noticeable stuttering in the movement of the gantry or in the function of any other component.