Inkscape
Sprint Four
The stories of (Franny and) Gertrude
The Story of Gertrude
Franny was just a step towards Gertrude (mostly focused on putting together all the mechanical and electrical pieces), her fully integrated sister, so let’s not worry about Franny.
Let’s take a look at Gertrude.

 Mechanically, Gertrude’s body (shown to the left) no longer had any angled edges or nice fillets, but instead sharp edges. Though this seems like a step back, it was all in the name of having a better platform to attach the housing to (CAD render shown to the right). Apart from that, a battery mount was integrated as well as a mounting system for our Perma Protoboard.
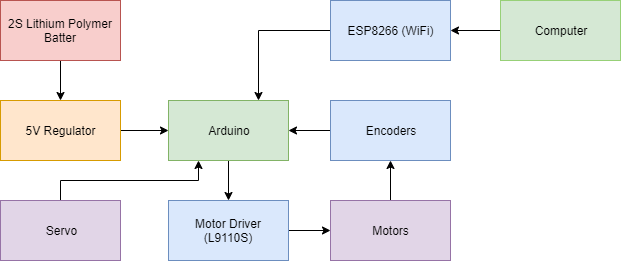 We took all the things that were supposed to be on our schematic and threw it on an Adafruit Perma Proto, a solder on breadboard. This included an Arduino Nano, ESP8266 (WiFi), 5V voltage regulator, motor driver (L9110S), encoder boards, motors, and a servo. The connections between these elements are shown in the electrical system diagram above.
  In the first iterations, we smoked an Arduino and a bunch of motor drivers. Some careful probing led to the eventual discovery of the problem: a shorted motor. After replacing the motor, we plugged it in, and for the first time, our motor driver did not smoke! This iteration, our robot was able to wirelessly communicate with a computer and actually move. The final electrical subsystem is shown to the left.
 With a working platform for testing code, we were able to get code previously written, fully implemented. A computer was wirelessly talking with the robot, then, the Arduino would process the data and move to the desired position using a PID control loop. The wireless communication system ended up being sidelined as it slowed down the main loop too much for the control loop to work. To get our robot drawing art, Arduino code was written to draw squares that were slowly rotated around the origin every time each one was drawn. This is demonstrated in the GIF on the right.