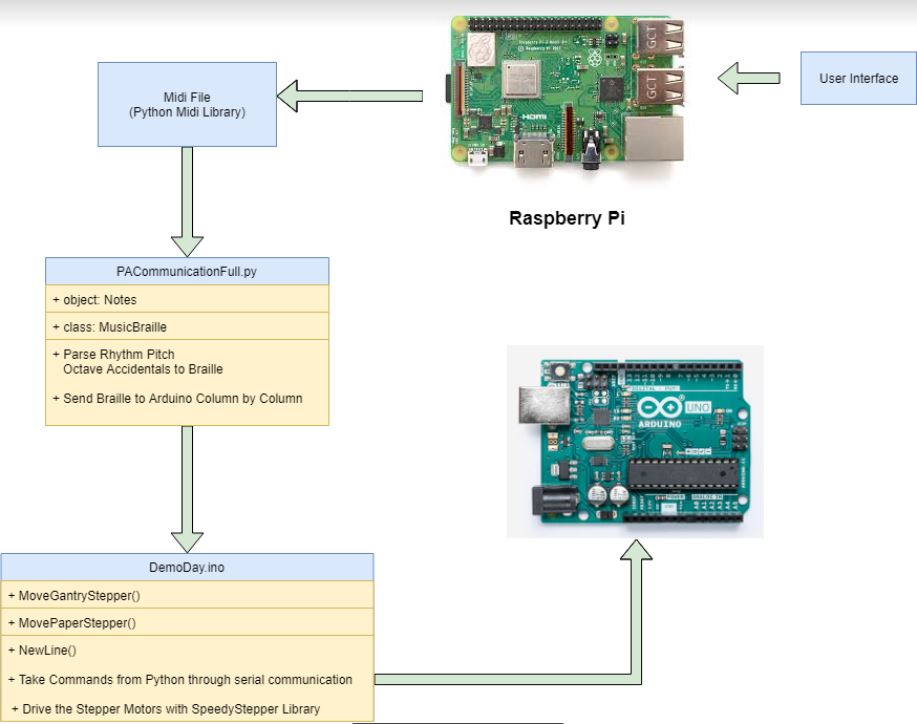
There are three main components of the system software component: Midi to Braille conversion, Python to Arduino Communication and Raspberry GUI.PACommunicationFull.py is the main script for the system software which takes a midi file, parses the music information and converts to motor command, and send the motor command to Arduino. DemoDay.ino is the embedded firm script for this project which receives motor command from Midi2Braille.py through serial communication and drives the solenoid and stepper motors. The summary for each component is described below and feel free to check out the details on the GitHub.
We create a program in Python that allowed us to take Midi files and convert each note to music braille format. In music braille, each braille cell is a 2x3 cell with 6 dots in total. The first two rows are used to specify the notes pitch value and the last row kis used to encode rhythm value. The picture below shows an example of the structure of music braille.
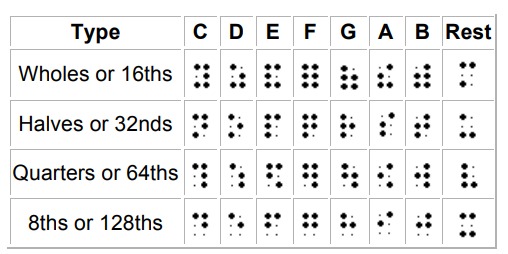

To parse rhythm, pitch, octave and accidental information of a note from a midi file, we use python-midi library to decode the corresponding values. We obtain the resolution of the song being stored which is known as the pulses per quarter note or ticks per beat. The resolution informs us about the duration of each quarter note in units of ticks. Then we can compute the corresponding rhythm for each note. The rhythm values are shown in Figure 1. To compute the pitch and octave, we use a mod 12 system.
For each braille cell, we store the value of each of the 6 dot in an array with column major as shown in Figure 2. In each stored cell, we use 1 to indicate a dot is present at the corresponding location in the cell and 0 to indicate a dot is not present. In this way, we convert musical values stored in a braille cell into motor command.
Due to the constraints from the mechanical system with only one solenoid executing the printing, instead of sending all 6 data in a braille cell, we decided to send the data column by column. We did not send individual data in the cell one by one because it will slow down the process of receiving information. For a given column, we map all 8 scenarios to an integer from 0 to 7 and send the data as a string through Python Arduino Serial communication.
| Column Type | First Row | Second Row | Third Row |
|---|---|---|---|
| 0 | 0 | 0 | 0 |
| 1 | 1 | 0 | 0 |
| 2 | 0 | 1 | 0 |
| 3 | 1 | 1 | 0 |
| 4 | 0 | 0 | 1 |
| 5 | 1 | 0 | 1 |
| 6 | 0 | 1 | 1 |
| 7 | 1 | 1 | 1 |
For differentiating between new column and new braille, we designate number 8 for new braille and 9 for new braille. For example, given a braille [1,1,1,0,1,0] in column major, the converted command sent through serial communication is “7”, “8”, “2”, “8”, “9”. We also decided to sent data all at once and then turn off the serial communication port to initiate the printing process. In this way, we do not need to tackle the time offset between serial communication and printing.
To add user interface to the project, we have integrated raspberry pi with 16x2 character adafruit lcd screen to both visualize and audioize the song titles. Python script is written to read midi file songs in a directed folder. The titles are stored in a one string array. Therefore when the user selects a song with right-arrow button, the python script returns the selected song’s index of an array to the python script that identifies music braille from the given midi file and sends corresponding commands to arduino.
For our embedded system, the main task is to control the stepper motors that drive the gantry and the paper roller based on the data received from Serial Communication through Python. We used the Speedy Stepper Library that allows us to easily write firmware for the motor Arduino CNC Shield V3 and control the stepper motors. Our firmware structure consisted of four main functions: Punch(). movePaper(),MoveGantryStepper(). The printing process will not be initiated if the serial communication is enabled. This ensures we receive all the data before starting the printing sequence. Setting up this way also allows us to do quick mechanical and electrical integration testing while continuing upgrading the software. The calibration for stepper motor movements is described below in unit of steps.
| X Stepper Motor | Distance between column | 35 |
| Distance between cells | 60 | |
| Distance between each line | -2380 | |
| Y Stepper Motor | Distance between row | 100 |
| Distance between each line | -400 |