Code Overview
Vector images and motor control
The software pipeline is composed of three major component divided up between a Raspberry Pi and an Arduino, as shown below.
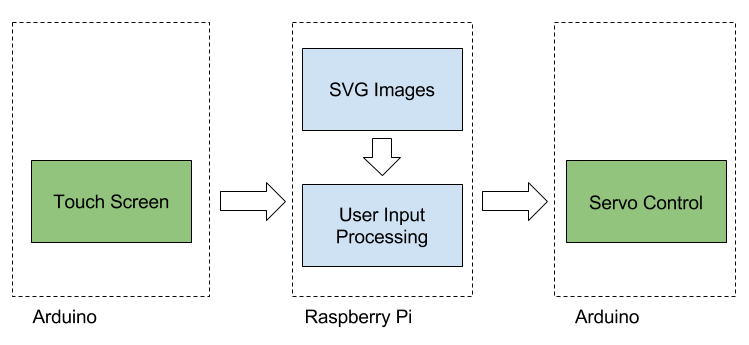
User Input
There are two avenues for user input: selection of an SVG preset image and drawing of custom drawing with the touchscreen. The touchscreen records input using an Arduino which, when appropriate, sends the data points through serial to a Raspberry Pi. The RasPi then processes the data, either from the touch screen or from a predetermined SVG file, and sends motor step instructions to a second Arduino through another serial connection.
Preset Images
When a preset image is selected, the SVG file must be converted and interpolated before being sent as motor step instructions. SVG files are actually just XML files with a path attribute, which can be parsed fairly easily. We still relied on the Python library svgPathTools in order to get a Bezier curve object. Bezier curves can be parametrized with a single variable, so we can interpolate the curve by plugging in a linearly increasing parameter. As a result, we get a curve whose points are equally spaced along the curve, which is important for the servos to move the laser at a constant speed around the sphere.
Touchscreen Input
While the Raspberry Pi has many gPIo pins, none of them can handle the analog signal sent by the touchscreen. For simplicity, we decided to read the data from the touchscreen with an Arduino and communicate with the RasPi over serial, instead of building a digital-analog converter. Under different time constraints, we may have considered the circuitry option a bit more. If the user starts drawing on the screen, the Arduino performs a running average and sends those points to the RasPi for processing. Soon, this will entail parametric curve smoothing and interpolation to get an output similar to the interpolated SVG points. For the moment, it just formats and stores the points until the user “uploads” the drawing.
Motor Control
When the user’s drawing or the SVG is uploaded, the points are sent to the servo’s Arduino through another serial connection. This Arduino begins operation in standby mode, “listening” for serial input from the Raspberry Pi. When the points are sent, it switches into read mode. It grabs the incoming points, scales them to a reasonable servomotor input range, stores them in memory, then switches into write mode, rapidly looping through the control points and sending the corresponding instructions to the motors, which drive the display of the final image on the screen. We experimented with dynamic memory allocation for on-the-fly, efficient storage of the input points, but eventually settled on the more reliable option of large static memory allocation.