What is WEAtheR Smart?
We all have those moments when we head out of our rooms greeted by a nice sunny weather, but later get stranded outside in the pouring rain without an umbrella. At that moment we all think of how great it would have been if we knew in advance to prepare...
...But now, we will only have moments where we are glad we have WEAther Smart.
WEAtheR Smart is a multifunctional desk that forecasts and displays the weather and also hands the appropriate item according to the weather forecast. The desk is about 120 cm high so that items are easy to reach. There is a 7 inch display on the desk that shows the current time, precipitation, average temperature, and minimum and maximum temperature.
The main components of WEAtheR Smart is the mechanical system with a stepper motor that gives rotational motion, and an arduino and a raspberry pi that fetch the weather and control the motor.
WEAtheR Smart was built as part of a class at Olin College of Engineering named "Principles of Engineering". It is a mechatronics class which brings electrical, mechanical and software systems together.
MVP and Stretch Goals
Our Minimum Viable Product (MVP) for this project was to get a robust, functional product that :
(1) Is able to fetch the daily and hourly weather
(2) Is able to rotate according to the weather information
(3) Is able to display the weather information.
We also aimed for some stretch goals that we would work on once we accomplished our MVP and had some time left. The stretch goals were :
(1) To make the product aesthetically pleasing
(2) To add in sensors to recognize if an item was taken
(3) Add temperature sensor to display the temperature inside
(4) To add sensors for a trigger mechanism.
At the end of the day, we were successful in accomplishing our MVP and the first three stretch goals!
What materials were used?
Below are some of the important materials and products used, where they can be bought, and how much they cost. Click on the products to shop!
Product |
Usage |
Cost |
Supplier |
For rotational motion |
$ 25.00 |
Amazon |
|
To control our entire system |
~$50.00 |
Adafruit / Amazon |
|
Display a user interface |
$79.94 |
Adafruit |
|
To control the motor |
~$25.00 |
Adafruit / Amazon |
|
Standing Desk |
$92.42 |
HomeDepot |
|
For temperature data inside the room |
$4.82 |
Amazon |
|
For integrating temperature sensor and the Raspberry Pi |
$14.75 |
Amazon |
For more information all of the materials and products we used and our budget, follow this link!
How was it designed?
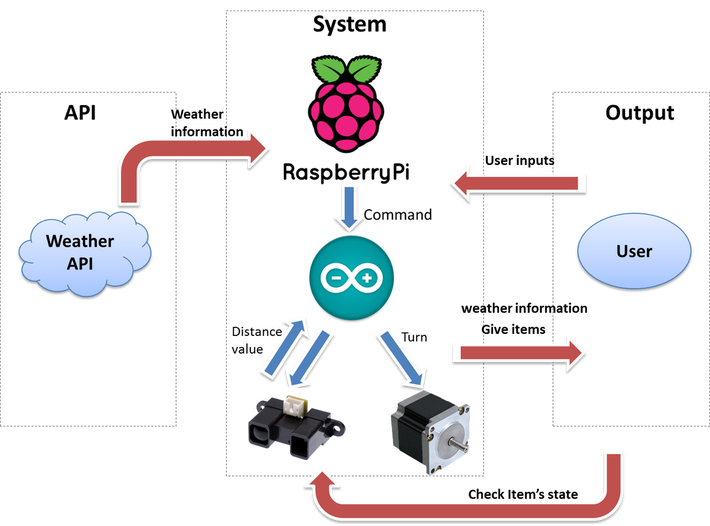
The system of our project is composed of 3 components, Raspberry-pi, Arduino and motor/sensor part. The raspberry-pi get the weather information from the weather API and give commands to arduino according to the information. Then the arduino turns the motor and the ir sensors check weather the items are taken off or not.
Learn more about the mechanical, electrical, firmware, and software parts of our project!