Information Interpretation - Code
What is MIDI?
MIDI is a serially transmitted digital signal that contains data bytes and command bytes. Command bytes specify whether a signal is on or off and data bytes specify velocity (translates to volume) or note value being played. MIDI sends a signal when a key is initially pressed and when it is released. We extract the note value and the command byte.
How we Read MIDIOur Arduino code midi_DCO_forks.ino takes in an analog voltage produced by the tuning fork and envelope generator as well as MIDI input from the keyboard via a USB serial port and outputs a square wave with frequency corresponding to the key pressed from digital output pin 3 on the Arduino and a pulse width modulation signal corresponding to a volume from pin 11 on the Arduino. The MIDI signal from the USB is interpreted by the python code read_send.py, which outputs a note value when a key is pressed and a zero when a key is released. This requires a python library called pyPortMIDI. The arduino code then uses that information to generate a square wave with the appropriate period.
|
Evolution of Our MIDI SystemTo control our synth we chose to use a MIDI controller because it a standard for electronic instruments. Initially, we tried using MIDI signals from the controller directly into the arduino using the circuit below. This did not work well enough for an unknown reason so we decided to interpret the MIDI using a laptop running python code to send a more specific message to the arduino via the serial port.
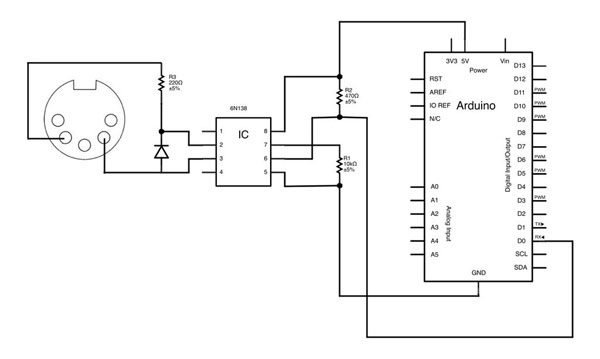
original MIDI reading circuitry
|
Control Voltage OutputBefore we began using the digitally controlled oscillators (i.e. the square wave generated by the Arduino from the MIDI data), we used voltage controlled oscillators described on the electrical page, to generate tones. The Arduino controlled the tones via a control voltage interpreted by a 12-bit serial digital to analog converter (DAC). The code for translating a MIDI signal to a signal for the DAC is titled MIDI2BradDACs.ino, and can be found in our github repository
Next StepsFor our future 2nd and 3rd oscillators, the frequency is adjustable by potentiometer. The combination of waveforms at different frequencies allows for the creation of interesting timbres. We will accomplish this by using a potentiometer to input a value into the arduino and having it shift the pitch (frequency) of the oscillators accordingly.
|
|
Here we show the system integration from MIDI input to square wave out of the arduino.
The components connections in order of transmission: keyboard to laptop (MIDI signal), laptop to Arduino (serial through python code), MIDI to pitch to control voltage output (all Arduino interpretation). |
|