Overall Framework
The etch as schech computing framework requires two distinct systems - a computer capable of process PCB designs and creating and processing the approprirate toolpaths and a real-time microcontroller to actually deliver these commands to the motors. We chose to create a system capable of running on Ubuntu and debian machines (and integrated directly with a Raspberry Pi minicomputer) to handle more expensive computation and an Arduino Uno V3 as our real-time microcontroller.
With these two systems, we can create a seammless workflow for the user - they transfer the file they hope to etch onto a workpiece to the computer, interact with a very simple Graphical User Interface (GUI) to confirm their selection, and watch the operation progress and complete.

Firmware Architecture
To safely and systematically handle the etching sequence, we implemented a state machine on the Arduino that is composed of three main states: Idle, Operational, and Error. The Idle state is made up of three additional substates: Idle Entry, Idle, and Idle Exit. Then, the Idle substate is made up of four sub-substates which are: Free, X, Y, and Z. The Operational state is made up of two substates: Etching and Etching Exit. The Error state currently consists of only one state: Limit Switch Error. The flows between all these different states in best illustrated through the image below.
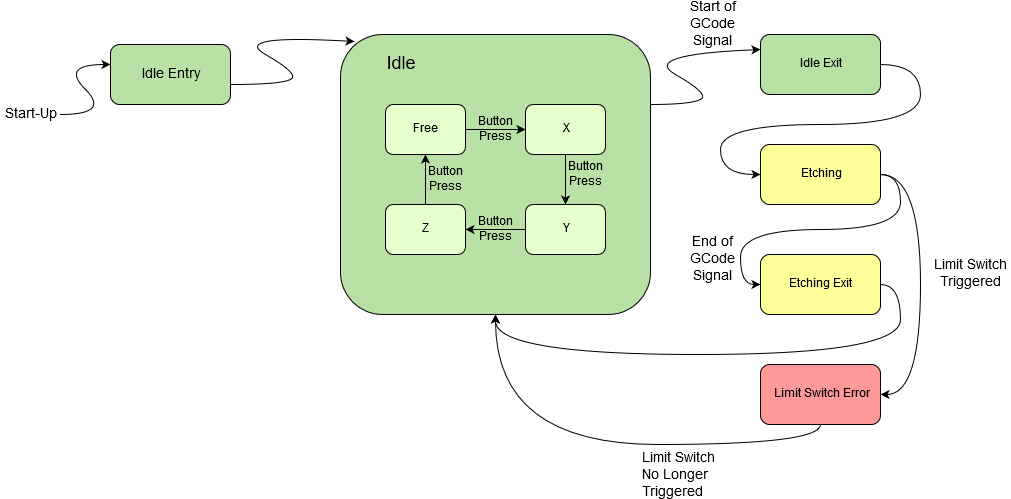
During the Idle entry state, Arduino sets up its proper general purpose input output to drive the different stepper motor and automatically transition to Idle state. Within the Idle state, a user is free to choose between jogging a specific axis and manually turning the lead screw for a particular axis. The amount by which to move a specific axis is determined by reading values from a quadrature encoder on the front panel of the enclosure for the system. Pushing down on the encoder triggers a switch between the axes, or a transition between the substates of the Idle substate.
When a milling job is ready to be executed, the Rasberry Pi sends a start signal that triggers an interrupt on the Arduino so that it enters the state Idle Exit. In Idle Exit, the Arduino enables all of the stepper motors and begins to spin the DC motor on the z axis.
Following the Idle Exit state, the system begins etching and enters the operational state. In this case, the Arduino actively listens on the serial port and runs a gcode parser. It holds the spindle speed constant throughout while the Arduino controls the stepper motors for each of the three axes according to the results of parsing the gcode sent to the Arduino from the Raspberry Pi. The program terminates when the Arduino receives an ending signal from the Raspberry pi along with the final line of gcode to interpret and execute. Once the last command has been executed, the Arduino will return to the Idle state.
Software Architecture
The software framework that runs on the computer (Windows PC, Ubuntu environment, Raspberry Pi, etc.) handles the user interaction necessary to obtain a file to etch the contents of, creating toolpaths from that file, formatting the toolpaths, and communicating each line of execution to the real-time microcontroller. While our fully integrated product uses the Raspberry Pi as its computing platform, our code is also compatible with most Linux machines capable of running bash and python.
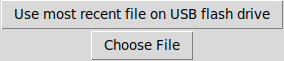
The user interface contains a tkinter-based graphical user interface (GUI) that can be used to either select the file from the computer's file system or choose the most recent file on a USB flash drive plugged into the machine. The GUI then triggers a shell script which executes the software pipeline.
The software framework then leverages FlatCAM to create toolpaths based on the tool diameter associated with the filetype of the chosen file. It displays the image to trace and the intended toolpath before continuing.
Due to the fact that FlatCAM's raw output has inconsistencies that complicate gcode parsing firmware, the program gcode_format.py processes the output gcode file and arranges its contents. Then, gcode_stream.py takes in the formatted gcode and tries to send the gcode commands line by line to the Arduino to execute. The Arduino and the gcoder streamer use a custom handshaking protocol to make sure that a new command will only be dispatched in the wake of last command's successful execution.
Dependencies
Both the firmware and software systems leverage a large number of existing frameworks and libraries. Those frameworks (and associated requirements for functionality) include:- Arduino
- StepperDriver: Arduino library for A4988, DRV8825, DRV8834, DRV8880 and generic two-pin (DIR/STEP) stepper motor drivers
- Encoder Library: Encoder counts pulses from quadrature encoded signals, which are commonly available from rotary knobs, motor r shaft sensors and other position sensors.
- Python 3
- Flatcam