The Subsystems

Mechanical | Electrical | Software

The three components

Stairpeggio has three components: a mechanical component, an electrical component, and a software component.
All three work together in harmony to create a piano staircase that is interactive and has excellent sound quality.

Mechanical component

In Stairpeggio, we choose to use solenoids for our striking mechanism.

A solenoid is a coil wound into a tightly packed helix, which produces a uniform magnetic field when an electric current is passed through it. If a magnet is placed in the middle of the solenoid, the magnetic field causes the magnet to shoot up, thus converting energy into linear motion.

We chose to wind our own solenoids both to optimize sound quality and to save money. Each one is made of ~400 coils of copper wire around a plastic tube. A 1/4-inch diameter, cylindrical magnet sits perfectly in the plastic tube, and the metal washer glued onto it strikes the key, producing a beautifully clear sound. The 8 solenoids hit the 8 glockenspiel keys in the F-major octave.

Mechanical design

box CAD design

One of our design goals was to have each box be as small as possible for greater mobility. For this to be possible, each box's core components consist of just one IR sensor, one solenoid, and one glockenspiel key. The key sits on (is screwed into) the top of the box with the solenoid placed underneath it, and the IR sensor fits snugly into a hole in the front of the box.

The Arduino Mega board, which contains the code to control all 8 boxes, sits in a box at the end, and slits on the side of the box allow ribbon wire to connect the boxes to the Arduino.

We later added lights to each box and taped them to the side of each key.

Electrical component

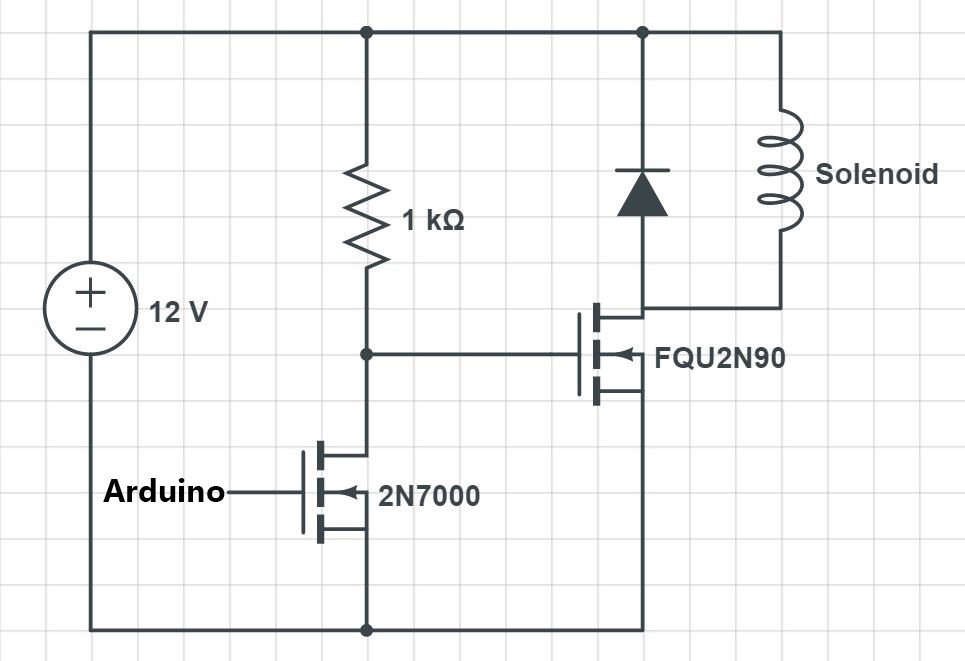
One major challenge we faced was that the solenoids we created took in around 10V, but the Arduino only gave out 5V. That left us with the problem of determining how to control our solenoids with our Arduino. Ultimately, we decided to use two separate power sources (a 12V source and our 5V Arduino), and use transistors to switch on and off each of the solenoids.

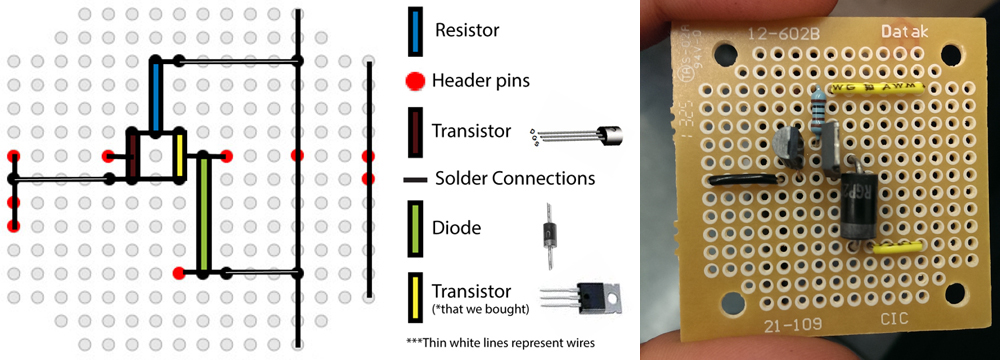
Since the solenoids we designed required 10V and drew a current of 1.2A, that helped us specify which components were necessary for the circuit. We designed our switch with a set of two transistors. By giving our first transistor a signal, we were able to pass current to the second transistor which powered the solenoid.

To drop the voltage for the first transistor, we used a 1kΩ resistor to prevent the first transistor from overheating. We also used a diode in parallel with the solenoid to prevent any excess current from travelling back through the circuit. In each box, we had one circuit of the same design; thus, in total, we had eight connected circuits.


In keeping with our minimalistic design, we chose to use perfboards instead of breadboards to save space. We soldered everything for each box onto each perfboard, including lights, MOSFETs, a solenoid, and an IR sensor.


Here is a diagram of our ribbon wire:

Since the first box contains the Arduino, the components in the first box connect directly to the Arduino without going through the ribbon wire.

Software component

How Stairpeggio works: an infographic


Stairpeggio essentially has two functioning modes: a default mode and a tutorial mode.

In the default mode, an IR sensor in each box reads the distance in front of it (normally, the wall). If someone steps on the stair, their foot steps between the box and the wall, and the IR sensor detects a change in the distance. The code then turns on the lights and solenoid in the box, and the solenoid's magnet strikes the glockenspiel key.

In the tutorial mode, Stairpeggio guides the user to play a song, which we have set to be the pentatonic scale. The song's notes are arranged into an array, and a counter i keeps track of the index in the song. It then turns on the lights in the i th box until someone steps on the stair, at which point the solenoid hits the key, turns off the light, and increments i so that the next box's lights turn on. At the end of the tutorial, it switches back to the default mode, and all 8 lights blink once in unison.

A pentatonic scale:


(There is also a calibration mode in which the base distances are set to the wall in front of the boxes.)

A button switches between the three modes.

The Arduino code can be found here on Github.


A visual representation of the default mode (mouse over for effect!)


A visual representation of the tutorial mode (mouse over for effect!)