Electrical system
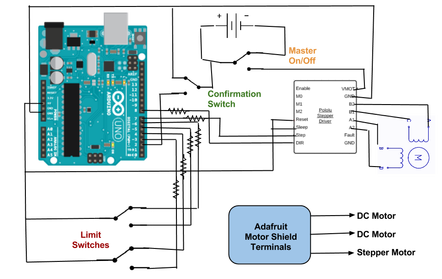
The electrical system can be broken into three major components as the connection between the software and mechanics: stepper motor for the rotating platform; stepper motor for linear actuation; and the DC motors for the two frosting dispensers. We implemented based on our fully-sketched circuit diagram (left).
Rather than have the dispensers move around the cake, our team found it to be beneficial to have the cake move itself in relation to the dispensers and used a rotating platform, driven by a stepper motor, to do so. The stepper motor we used was not compatible with the Adafruit Motor Shield as it pulled more current than was given and had to be driven by a Pololu DRV8825 stepper driver. The driver was assembled separately on a breadboard -- and set for a full step. The pins of the Arduino Uno are used to correlate motion with the code. Furthermore, a fan was added for ventilation in the electronics crevice under the platform, in order to help prevent any additional heating.
For linear movement of the top frosting dispenser, which generates designs on the face of the cake, we use a Nema 17 stepper motor, which is Adafruit compatible and requires minimal set-up. As the dispenser requires less torque than the rotating platform, we can use such a stepper motor to move the linear belt with less current.
For the two frosting dispensers, a combination of 3D-printed gears and DC motors determine the pressure at which the frosting is extruded. The two frosting dispensers utilize the same electrical and mechanical systems: the DC motor used is also compatible with the Adafruit Motor Shield and is attached on the other motor ports. Based on the Arduino code designed, the three-letter codes sent from the pyserial (GUI) to the Arduino serial input trigger respective motions in all the included motors. See SOFTWARE for more information on Arduino code.