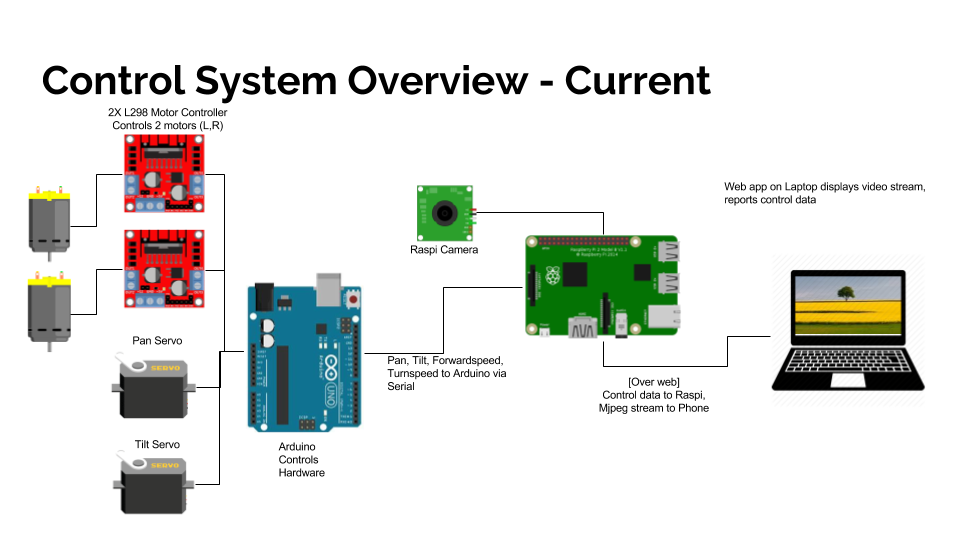
Due to the nature of a telepresence robot, our system needed to execute code on three different systems
- The user’s device (through a web browser)
- The Raspberry Pi on the robot (for connecting video and audio data to the internet)
- The Arduino on the robot (for low-level control of motors)
The majority of the electical and software systems created for this project serve to complete these various links between devices, enabling the robot to move from commands sent over the internet as reliably as possible.
Software Systems
Raspberry Pi <-> Arduino
The communication between the Raspberry Pi and the Arduino is done over a 57600 baud serial communication link through the Raspberry Pi’s USB bus. This enables us to route the connection through COTS cabling, while passing both 5V power and data through the same link.
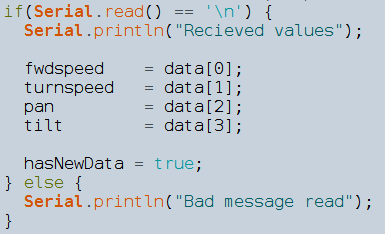 In our testing, we discovered that Serial communication to the Arduino could be unreliable in some cases, so we used a newline character
 0x0A as both a separator and as a simple checksum to ensure data corruption did not occur. When the data is recieved, we first store the values in a temporary buffer on the stack, and only copy them to global variables if they are followed by a newline.
As an additional measure to help ensure system robustness, we instructed the code on the Raspberry Pi to handle communication errors by terminating communication and rescanning to discover what port the communication should resume on. This enabled us to disconnect the USB cable completely, and still have the system recover when communications became possible again.
Computer <-> (control data) <-> Raspberry Pi
One key performance parameter of our system is the end-to-end latency, a measure of how long it takes until a keystroke to move the robot results in a visible response in the video data. In order to quickly transmit control commands and status data to the robot we turned to Websockets, a HTML5 technology with universal support in modern browsers. On the Raspberry Pi, we executed a custom script that acted as a Websocket server and proxied commands it recieved over the serial bus.
Using Websockets for the primary command transmission mechanism allowed us to write our client code as vanilla Javascript, without needing to import external libraries. Additionally, it meant we could use standard web development tools like nginx as components in our system with minimal extra work.
Computer <-> (audio-video data) <-> Robot
Because streaming live video requires significantly more processing and bandwidth availability, it is not possible for custom-written code to perform at the level we needed. To resolve this, we configured an open-source daemon called UV4L to read video from the camera, encode the data, and transmit the result over the internet. Because UV4L is highly optimized for the Raspberry Pi, it is able to use the hardware-accelerated MP4 encoders, allowing for full HD streaming when the internet connection allows.
Lessons Learned
- Use existing libraries and formats whenever possible, especially for recording and processing video.
- To create a reliable system, make sure that every piece can detect failures and restart itself.
- Linux’s builtin ability to start scripts when the system boots is really nice, but makes it difficult to keep all your code in one place
- Unlike with hardware, rebuilding software systems from scratch is rarely necessary. Structure the code such that it can be build on gradually.
Check out all our software at our github repo!