Software/Firmware Systems

Overview

We are able to process note input from either a MIDI file or PDF sheet music and translate it into servo commands. We are able to read music in two ways primarily because we were unsure when scoping our project how long it would take to develop accurate music recognition software. As a result, we started by reading MIDI files, which are simple sequences of different types of events. Having robust music reading early on in the project allowed us to test our electrical and mechanical systems. In parallel, we developed optical music recognition software which finds notes in images of sheet music, identifies their names, characterizes their durations, and constructs a sequence of note events similar to a MIDI file. For a full list of external libraries we used, see the readMe on our Github page.

  • Python System Diagram

    The diagram to the left depicts the two possible pipelines for converting music into sequences of notes: the MIDI file reading system and the optical music recognition software.

    A MIDI file is a format which contains musical information in the form of a sequence of note-on and note-off events. We used a Python library to unpack the sequence of events.

    The optical music recognition uses computer vision via the OpenCV package for Python to find, identify, and characterize notes in a sheet of music.

    Once we have obtained a sequence of notes, we encode each distinct keyboard state as a binary string and store the time at which it should occur. Each bit of the string represents whether a specific key is depressed (1) or released (0). The Python system is then ready to transmit binary strings and times to the Arduino.


  • MIDI File Reading

    MIDI files are a type of music file comprised of events. In this section of code, we use an open-source Python-MIDI library to open the file, identify note-on and note-off events, gather together the ones which occur simultaneously, and recognize the pitches. At that point, we are able to construct binary keyboard states for transmission to the Arduino.

  • Note Isolation Process

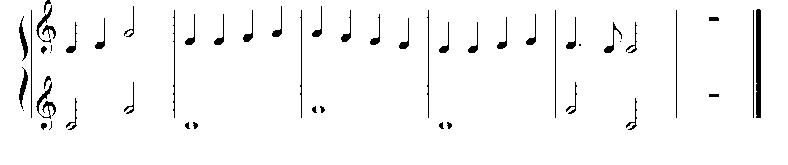
    First, we convert a PDF of the sheet music into a PNG image file which OpenCV in Python is capable of reading. Next, we search through the entire image and use the HoughLines algorithm to find and save the y-location of every staff line within the image (shown as the thick horizontal lines to the left)

    Next, we split the image into several images, each representing a single line of music. In the process we destroy the staff lines, leaving only the notes behind. Since we saved the staff line locations, we are still able to identify notes.

    Next, we use a connectivity search to traverse a line of music column by column, checking if it contains any black pixels. We crop out columns that contain black pixels and group them together as note objects.

  • Note Characterization and Identification

    After we have eliminated whitespace columns and grouped note objects, we split each note object image in half along the horizontal line which separate the treble clef staff from the bass clef staff.

    We then send each half through a mean-shift algorithm which locates the center of mass of black pixels in the image, which we consider to be the center of the note. This algorithm checks if the center is black or white to distinguish between half and quarter notes, and checks for the existence of a stem to distinguish between whole and half notes. If it detects more than one note in the image (in a group of eighth notes), it breaks them apart and locates each center individually.

    We compare the location of the identified center of the note to the locations of the staff lines, saved during the isolation process, to identify which line or space corresponds to the note's vertical position. With this, we have obtained the note name (C5, E4, B3...) and characterized the duration (half, quarter, ...).

  • Receiving and Playing Notes with Arduino

    Once the Python environment has processed the note input, it sends a string representing a group of state/time pairs to the Arduino. The Arduino buffers the string until it receives an intermediate end character. When it receives the end character, it processes the string. Processing involves splitting each keyboard state and the corresponding time off, separating the keyboard state (a binary string) into byte-sized pieces and storing them to the EEPROM (the Arduino's byte memory), then pushing the associated time to a queue. The Arduino continues doing this until it receives the final end character, which indicates that Python is finished sending the entire song.

    Next, the Arduino transitions to the note playing state. First, it starts a clock so note timings will be consistent; then, it begins a loop that peeks at the next time in the queue until it is exceeded by the current time since start. At this point, it pops the time from the queue and reconstructs the corresponding keyboard state by retrieving bytes from the appropriate EEPROM addresses. It plays the keyboard state by looping through the string and positioning each servo accordingly. This process of checking and playing continues as long as there are still times left in the queue.

  • Changes and Reflection

    Overall, our project was well-scoped, especially for the strengths of our team. The challenges we chose to embrace were primarily software-related, which matched the interests and skills of our team. At the start of the project, we set a very realistic minimum software deliverable: we wanted to be able to use a MIDI file to control a single octave of notes. In addition, we set two stretch goals: more motors (from the software perspective, a trivial scaling problem) and the ability to use computer vision to read sheet music (a much more involved problem).

    Setting such a feasible minimum goal for the software system and breaking down the problem between multiple team members allowed us to be flexible. This became unexpectedly useful when we encountered the memory limit of our Arduino (and, subsequently, the request processing time involved in our serial communication) in an early version of the serial communication. These limitations forced us to rethink our infrastructure, which opened up several learning opportunities. Working with the memory limit and around the serial delay allowed us to explore in great depth the types of memory on an Arduino and the capabilities of each, and it prompted us to think about how to encode data compactly.

    We started out thinking about our system in the abstract, and as a result we built our software as several modular subsystems. This allowed us to move forward with the other subsystems individually, even when one took longer than expected. Thus, our goals remained largely the same through the project, with the minor change that at the end of the semester, we spent much of our time focusing on meeting our stretch goals.